
How to Apply Eyeliner for Beginners: A Comprehensive Step-by-Step Guide
Eyeliner is a versatile makeup essential that can dramatically enhance your eye shape, add definition, and create various looks—from subtle daytime wear to bold evening styles. For beginners, mastering the art of applying eyeliner may seem intimidating, but with patience, practice, and the right techniques, you’ll soon be able to achieve professional-looking results. This comprehensive guide will walk you through everything you need to know, from understanding different types of eyeliners to step-by-step application instructions, tips for mastering the look, and troubleshooting common issues.
Table of Contents
- Understanding Eyeliner Types and Tools
- Preparing Your Eyes for Eyeliner Application
- Choosing the Right Eyeliner for Your Look and Eye Shape
- Step-by-Step Guide to Applying Eyeliner
- Basic Eyeliner Application
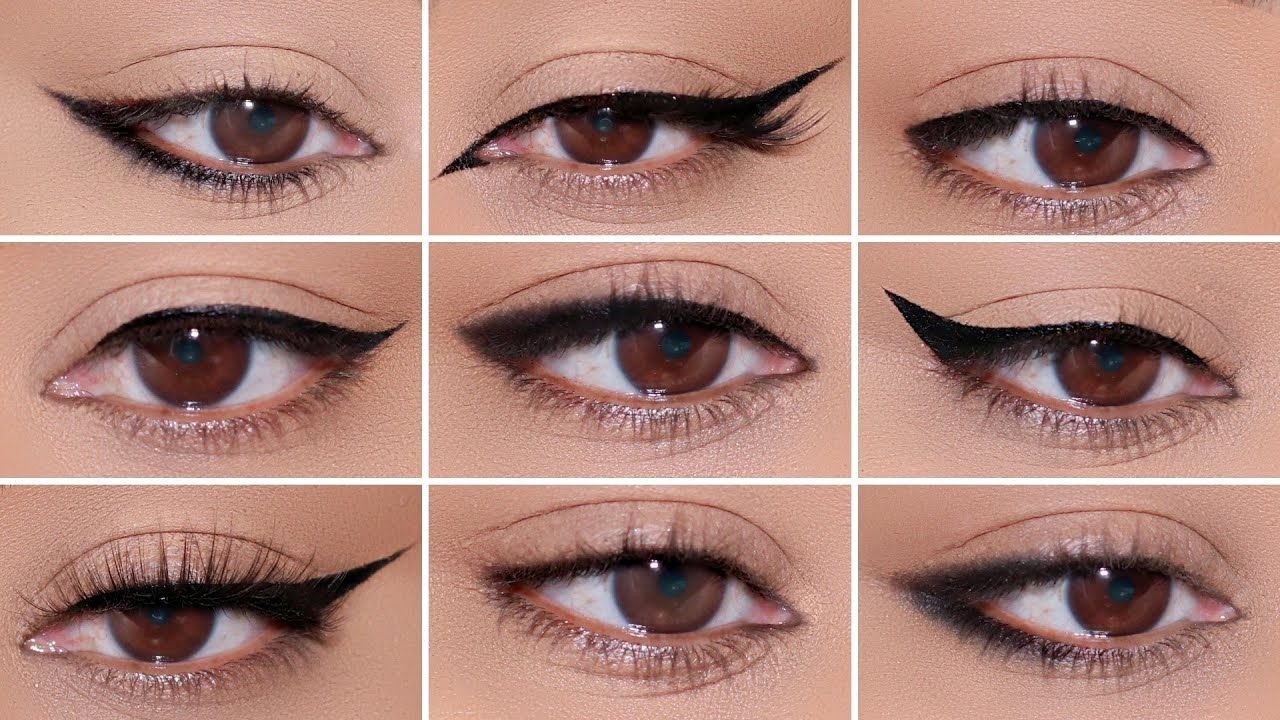
- Creating Different Styles (Natural, Dramatic, Cat Eye, Smokey)
- Tips and Tricks for Beginners
- Common Mistakes and How to Avoid Them
- Maintaining and Removing Eyeliner
- Practice Tips and Final Thoughts
1. Understanding Eyeliner Types and Tools
Before diving into application techniques, it’s essential to familiarize yourself with the different types of eyeliners and tools available.
Types of Eyeliner
- Pencil Eyeliner
- Pros: Easy to control, inexpensive, portable, great for beginners.
- Cons: May require sharpening; less intense color payoff.
- Gel Eyeliner
- Pros: Long-lasting, rich pigmentation, can be smudged for softer looks.
- Cons: Requires an angled brush; some may find it harder to apply precisely.
- Liquid Eyeliner
- Pros: Sharp, precise lines; available in various finishes (matte, gloss).
- Cons: Can be tricky to control for beginners; dries quickly.
- Cream or Paint Pot Eyeliner
- Similar to gel but often used with brushes; good for creating bold lines.
Tools You Will Need
- Eyeliner Pencil or Retractable Pencil
- Angled or Fine-Tip Brush (for gel or cream liners)
- Liquid Eyeliner Pen or Brush Applicator
- Cotton Swabs and Makeup Remover (for corrections)
- Mirror with Good Lighting
2. Preparing Your Eyes for Eyeliner Application
Preparation is key to achieving a neat and comfortable eyeliner look.
- Cleanse and Moisturize: Start with a clean face and moisturized eyelids to prevent smudging and ensure smooth application.
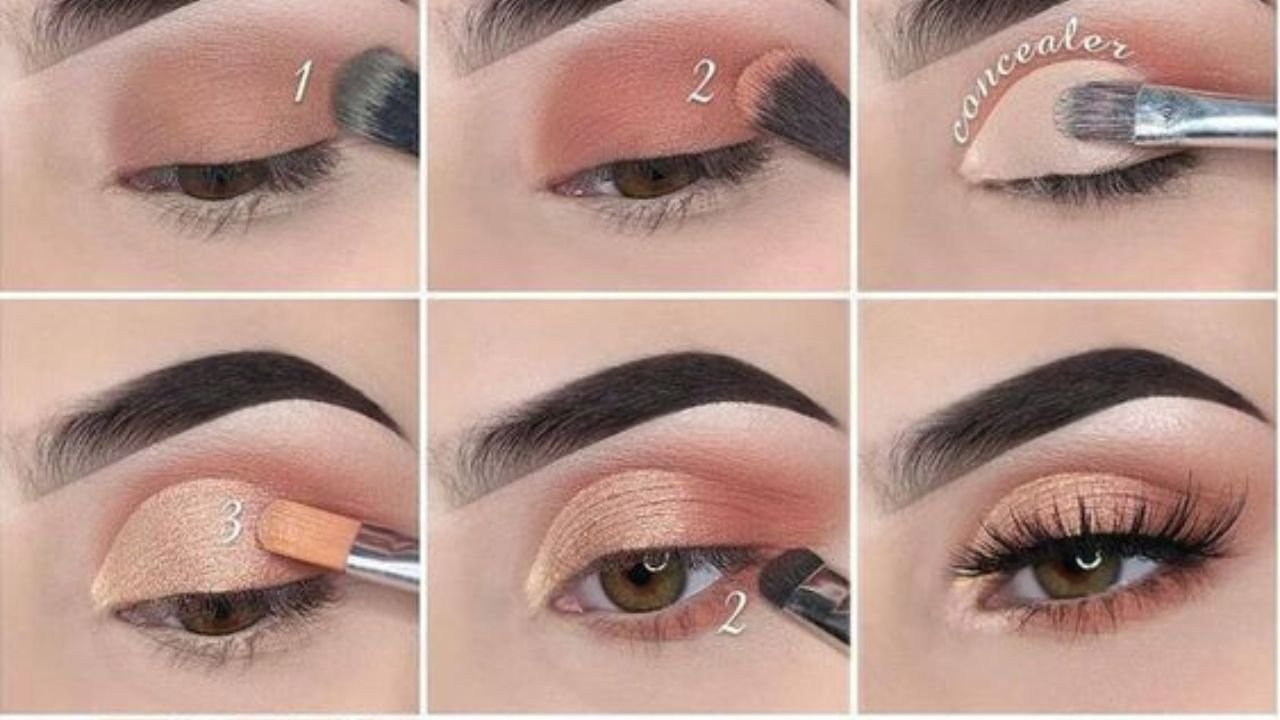
- Prime Your Eyelids: Use an eyeshadow primer or a bit of concealer to create an even base, which helps eyeliner stay put longer and prevents smudging.
- Set Your Base: Lightly dust translucent powder over your eyelids to absorb excess oil.
- Curl Your Eyelashes: Curling opens up the eyes and makes your eyeliner look more prominent.
- Apply Eye Shadow (Optional): Light eye shadow can enhance your eyeliner look, especially if you’re creating more dramatic styles.
3. Choosing the Right Eyeliner for Your Look and Eye Shape
Understanding your eye shape and desired look will guide your choice of eyeliner style.
For Different Eye Shapes:
- Hooded Eyes: Thin lines along the lash line; avoid thick lines that can make eyes appear smaller.
- Almond Eyes: Versatile; most styles suit almond-shaped eyes.
- Round Eyes: Extend the eyeliner slightly beyond the outer corner for elongation.
- Monolid Eyes: Focus on tightlining and creating a wing to lift the eyes.
- Downturned Eyes: Create upward flicks to lift the outer corners.
For Different Looks:
- Natural Look: Soft pencil or tightlining with minimal product.
- Dramatic Look: Bold lines with liquid or gel liners, wings, or smoky effects.
- Cat Eye or Winged Look: Emphasizes the outer corner with a wing extending outward.
4. Step-by-Step Guide to Applying Eyeliner
Basic Eyeliner Application
This section covers the fundamental process suitable for beginners, focusing on achieving a clean line along the upper lash line.
Step 1: Gather Your Tools and Prepare
Have your eyeliner, mirror, and any tools ready. Make sure your eyelids are primed and free of excess oil.
Step 2: Choose Your Starting Point
Most beginners find it easiest to start from the inner corner of the eye, working outward. Alternatively, some prefer to start from the middle and connect to the inner and outer corners.
Step 3: Draw a Thin Line Along the Lash Line
Using your chosen eyeliner:
- Pencil: Gently run the pencil along the lash line, starting from the inner corner. Keep the line thin and close to the lashes.
- Gel or Cream: Dip your brush into the gel, wipe off excess, and carefully draw along the lash line.
- Liquid: Using the tip of the applicator, draw a line from the inner corner outward, keeping it close to the lashes.
Tip: Keep your eye open and relaxed. Use small, controlled strokes rather than trying to draw one continuous line.
Step 4: Build Up the Line
Gradually thicken the line if desired, especially at the outer corner, to create more impact.
Step 5: Connect and Perfect
Ensure the line is smooth and connected at the inner and outer corners. Use a cotton swab dipped in makeup remover to clean any mistakes.
Step 6: Finish Your Look
Apply mascara to your lashes to complete the look. You can also add eyeliner to the lower lash line for more definition, but keep it light for a natural appearance, or bold for drama.
Creating Different Styles
Once you’ve mastered the basic line, you can explore various eyeliner styles:
1. Natural Tightlining
- Use a brown or soft pencil to line the waterline and upper lash line for subtle enhancement.
2. Classic Winged Liner
- Draw a thin line along the upper lash line, then extend it outward and upward at the outer corner, creating a wing.
3. Bold Cat Eye
- Make the wing more prominent and elongated, following the natural angle of your lower lash line.
4. Smokey Eye with Blended Eyeliner
- Smudge a pencil or gel liner along the lash line and blend with a brush for a softer, smoky effect.
5. Double Liner
- Draw two parallel lines along the lash line for a more graphic look.
5. Tips and Tricks for Beginners
- Start with Light Hand Pressure: It’s easier to build up intensity than to fix heavy-handed mistakes.
- Use a Steady Surface: Rest your elbow on a table or use a hand to steady your arm for better control.
- Practice on Both Eyes: Symmetry is key; practice to make both eyes match.
- Use Tape or Stencils: For sharp wings or lines, use painter’s tape or stencils as guides.
- Choose the Right Brush: Fine-tipped brushes give more control for detailed work; angled brushes help with wings.
- Take Breaks: Rest if your hand gets tired to prevent uneven lines.
- Warm Up Your Eyeliner: Slightly warming pencil eyeliners with your hands can make application smoother.
- Don’t Rush: Take your time—quick strokes lead to uneven lines.
6. Common Mistakes and How to Avoid Them
| Mistake | How to Avoid | Solution |
|---|---|---|
| Uneven lines | Steady your hand, use guide tape | Practice with light strokes |
| Smudging | Use a primer, set with powder | Use waterproof eyeliners |
| Overdrawing or harsh lines | Start lightly, build gradually | Use a cotton swab for correction |
| Not matching both eyes | Practice symmetry | Use a mirror with good lighting |
| Applying too much product | Use minimal product, layer | Remove excess before applying |
7. Maintaining and Removing Eyeliner
Proper removal and maintenance ensure healthy eyes and prolong your eyeliner’s lifespan.
- Removal: Use a gentle eye makeup remover suitable for your eyeliner type. Cotton pads or soft cloths work best.
- Cleaning Your Tools: Regularly clean brushes and pencils to prevent bacteria buildup.
- Store Properly: Keep eyeliners in a cool, dry place, and sharpen pencils regularly.
8. Practice Tips and Final Thoughts
Becoming proficient at applying eyeliner takes time and patience. Here are some final tips:
- Practice Regularly: Dedicate a few minutes daily to practice different styles.
- Watch Tutorials: Visual guides can help you understand angles and techniques.
- Experiment: Try different styles to see what suits your eye shape and personal style.
- Stay Patient: Mistakes are part of learning; don’t get discouraged.
- Celebrate Progress: Notice your improvements over time and enjoy the process.
Conclusion
Applying eyeliner as a beginner may seem challenging at first, but with the right tools, techniques, and patience, you’ll be able to create stunning looks that accentuate your eyes. Remember to start simple, practice consistently, and experiment with different styles to find what works best for you. Eyeliner is an art form that can transform your entire makeup look—so have fun with it, and don’t be afraid to try new things!
Related Post
Step-by-Step Natural Eye Makeup Tutorial for Beginners
Introduction Natural eye makeup is all about enhancing your eyes without heavy or dramatic products. [...]

Glow Time® Blush Stick
Jane Iredale Glow Time® Blush Stick: A Creamy, Multitasking Marvel for Radiant Color Overview The [...]
Makeup kit for girls: The 10 Must-Have Products
Introduction Starting a makeup collection can feel overwhelming with countless products available. However, a well-curated, [...]